A poly water tank is a long-term investment. Whether it’s a rainwater tank for the house, a stock water tank for the paddock or a cartage tank for the ute, how well it’s installed affects how long it lasts. Most tank problems we see come down to one thing: the base.
Here’s how to prepare and install a tank properly.
Step 1: Choose the right location
Before you dig or order materials, think about where the tank will sit.
- Check for council requirements. Some councils require approval for larger tanks or tanks close to boundaries or buildings. Check with your local council first.
- Keep it close to the water source. For rainwater, position the tank near the downpipes to reduce pipe runs and keep the fall of the pipework efficient.
- Allow access. Leave room for delivery, plumbing, and later maintenance, including a pump if you’re adding one.
- Avoid problem areas. Stay clear of large tree roots, overhead powerlines, underground services, drainage lines and the edges of embankments or cuttings.
- Think about the ground. Reactive clay soils, which are common in our region, move as they dry and swell. They need extra care with base preparation.
Step 2: Understand the weight
Water is heavy: one litre weighs one kilogram. A 10,000L tank carries 10 tonnes of water, and a 22,500L tank carries more than 22 tonnes. The base has to carry that load evenly and permanently, which is why it can’t be skipped or rushed.
Step 3: Prepare the base
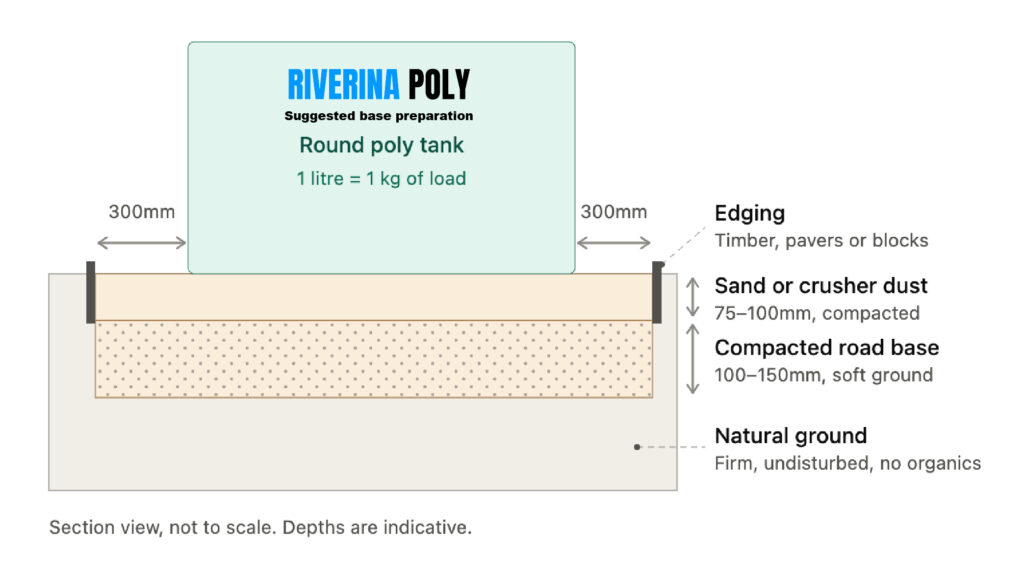
The base needs to be level, firm, smooth and well drained. It should also be larger than the tank footprint, so the tank sits fully supported with no overhanging edges.
Option A: Compacted sand or crusher dust base (round tanks)
This suits most round tanks on stable ground.
- Mark out the area. Make the base wider than the tank, allowing a margin of around 300mm all round.
- Remove topsoil, grass and organic matter. Dig down to firm, stable ground.
- Build up the base. Lay compacted road base if the ground is soft, then finish with a layer of compacted sand or fine crusher dust.
- Compact well. Use a plate compactor, not a rake and a hopeful foot stomp.
- Check it’s level. Use a long straight edge and a spirit level. Any high spots or dips will put uneven stress on the tank wall and floor.
- Make sure it’s free of sharp objects. Stones, sticks and rubble can damage the base of the tank over time.
- Contain the base. Edge the base with timber, pavers or a retaining border so it doesn’t wash away in heavy rain.
Option B: Concrete slab (slimline tanks, larger tanks, or soft ground)
A concrete slab is the best option for slimline tanks, larger tanks and any site with poor soils.
- Use a reinforced slab of suitable thickness for the tank size. Have it checked by a builder or engineer if you’re unsure.
- Make sure it’s level and finished smooth with no ridges, bumps or protruding steel.
- Let the concrete cure fully before the tank goes on.
- Slimline tanks must sit fully on the slab, with no part of the base hanging over the edge.
What to avoid
- Building directly on grass, topsoil or loose fill
- Sitting a tank on bricks, blocks or a partial base
- Placing a tank on a slope without proper levelling or retaining
- Using a base that’s smaller than the tank
Step 4: Position the tank
Once the base is ready, the tank is placed on it. Our team can advise on delivery and positioning.
- Check the base one more time for debris before the tank goes down.
- Position the tank so the outlets, overflow and inlets face the right direction for your plumbing.
- Never drag a tank across the base. Lift or roll it carefully into place.
Step 5: Connect the plumbing
With the tank in position, install your fittings and pipework.
- Inlets: Fit a leaf diverter or first flush diverter on the downpipe to keep leaves and debris out of the tank.
- Overflow: Make sure the overflow pipe is the same size as (or larger than) the inlet, and direct it away from the tank base so water doesn’t undermine it. Connect it to a stormwater drain or a safe discharge area.
- Outlets: Use a flexible connection between the tank and rigid pipework so the tank can move slightly as it fills and empties without stressing the fittings.
- Mesh screens: Fit insect-proof screens on all openings to keep mosquitoes out.
- Tighten sensibly. Overtightening poly fittings can crack them. Use thread tape and hand-tighten plus a small amount of extra turn.
- Pump: If you’re adding a pump, mount it on a stable pad close to the tank and follow the manufacturer’s instructions.
Step 6: Fill the tank gradually
Fill the tank slowly at first. Keep an eye on the base as the level rises, checking that it’s settling evenly and that fittings aren’t leaking. Any issues are much easier to fix with the tank half full than full.
Step 7: Maintain your tank
- Clean gutters and screens regularly, especially after storms and in autumn.
- Check the overflow and base area for erosion.
- Inspect fittings and screens each season.
- Have the tank cleaned out if sediment builds up.
Why installation matters
A properly prepared base protects your tank and your warranty, and gives you years of reliable water storage. Our tanks are made right here in Moama from high-quality materials and built for Australia’s harsh conditions. Round tanks come with a 10-year warranty, slimline tanks with a 5-year warranty, and there’s a wide range of colours to match your property. Installation conditions can affect warranty coverage, so it’s worth getting it right the first time.
Need help choosing or installing a tank?
Riverina Poly supplies tanks across Northern Victoria and Southern NSW. Not sure what size, style or base you need? Get in touch for advice or a quote.